About L'Heure Bleue At Home

Shop Photo Gallery

Offers and Discount Codes

Showing posts with label Handmade Gifts. Show all posts

Monday, 6 December 2021

Christmas Gift Ideas Crafting with Felts

 Hello Friends! It’s been a long while since my last post. I needed a break to take care of my mental health. It just got to a point where I needed time to do a lot of soul searching and healing. Lately, I have been discovering the calming effects of crafting. I can forget all of my worries for awhile. It feels so satisfying to create something with my hands.


I have always had a fascination with pincushions. It is such an unsung hero in the crafter’s toolbox. Swallows symbolize a safe return home and, as we are spending so much time at home these days, I wanted to add a swallow to my pincushion.


Pets are such an integral part of home and family life, aren’t they? I designed a pincushion to reflect that as well. This pincushion above which I called “Cat Love” features a cat playing with a ball of yarn (a vintage button). 
With my creative juices flowing, I have been busily crafting felt flowers that multitask as brooches and hair clips as well.


I just think there is something so sweet and wholesome about painstakingly crafting a gift to give away. It truly is a gift from the heart.


Wednesday, 16 December 2020

Blogmas Day 16 Handmade DIY Christmas Gifts Hair Clips Brooches Pendants With Beads and Buttons How To

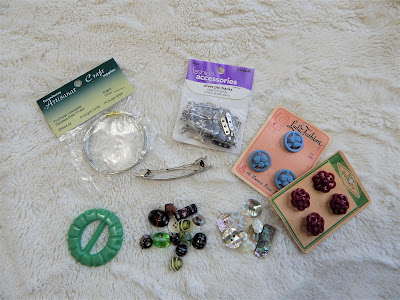
 Welcome to Blogmas Day 16!  I have always loved unusual buttons as I felt that they had the underrated power to really elevate an outfit.  Over the years, I have amassed a small collection of vintage buttons as well as a handful of beautiful glass beads.  I really wanted to pull them out of the depths of a dresser drawer and do something creative with them.  Here is a DIY craft that doesn't require any level of specialized skill.


You will need beads and or buttons, pin backs, fine guage wire and hair clips.  You may also want transparent fishing line, pliers and a hot glue gun. The pin backs have holes for you to thread wire or fishing line.  The hair clip had a hole at either end as well.  I used both without issue.  Because the fishing line is transparent, you may prefer using that.  You may also wish to use hot glue for greater adhesion.  I found that I didn't need a large needle to work with the wire or fishing line as both were substantial enough for me to handle them with ease.  Use the pliers to snip off the wire once you have finished threading the beads and/or buttons and secured them together to pin back or hair clip. 


This is where you can really get creative.  Select the beads and buttons you want to work with and string them together with either wire or fishing line.  I made a long dangly pendant and attached a lobster claw clasp at one end so that it can clip easily to a chain.  I used a vintage button with a flat back at the end of the pendant so that I didn't have to make an ugly knot. I also strung together gorgeous handmade glass beads on a hairclip and attached a rectangular midnight blue glass bead to a pin back to form a one-of-a-kind brooch.  Buttons with a little loop at the back are easy to string together and attach to a hairclip as well.   Each bead is handmade and is like a tiny work of art in itself.  Placed in a pretty gift box or little jewelry bag, they make gorgeous, unique gifts.

Subscribe and share with a friend.


Tuesday, 15 December 2020

Blogmas Day 15 DIY Handmade Essential Oil Reed Diffuser How To

 Welcome to Blogmas Day 15!  Now that we are all spending so much more time at home, nesting and making the home as cozy as possible has become a national, if not, international obsession.  A big part of creating a homey ambiance is deploying delicious fragrances into the air.  I love a good scented candle but I don't love worrying about the flame.  I much prefer reed diffusers because they are scenting the air 24/7 without me having to worry about leaving an unattended lit candle.  However, essential oil reed diffusers can be prohibitively expensive.  In the past, I have bought reed diffusers that had no scent throw whatsoever. As well, until smell-o-vision is invented, ordering reed diffusers online is a risky business.  Below are the instructions for a handmade, DIY essential oil reed diffuser.  The great thing about making your own is that you can personalize the scent.  Even the most clumsy amongst us can master this as it really doesn't require any special skills at all.


You will need:
1/2 cup safflower oil (you may adjust the amount of carrier oil depending on the size of the display container you will be using)
9 reed sticks
30 drops of each type of essential oil
1-2 tablespoons of isopropyl alcohol
display container with a narrow neck opening

Mix everything in a glass bowl or a glass measuring cup then pour into the container of your choice.  When choosing essential oils, imagine your favourite perfume or scents.  Do you just want a single note or a medley?  Adjust the levels of the essential oils according to which ones you want to dominate. Think top, middle and base notes.

I would advise against using carrier oils that are thick or have a strong aroma such as olive and sesame oil.  A thick oil will have difficulty travelling up the reed and a strong aroma will interfere with the fragrance of the essential oils.  I chose safflower oil because it is readily available at the grocery store and is affordable.  You should use a glass container that has a narrow neck opening as the essential oil mixture will not evaporate as quickly.


You can use vintage perfume bottles, glass jars or even glass vases for your display container.  I decided to use the vase as the opening was sufficient to hold 9 sticks and I didn't have to shorten them.  You want to have a sufficient length of reed protruding from the top.  The reeds should be flipped once a week to maintain a constant scent throw.  


Handmade essential oil reed diffusers make a lovely gift.  Just decant the essential oil mixture into a pretty lidded jar that is leakproof, arrange it in a box or basket with the display container, the reeds and a festive note describing the essential oils that you chose.

Subscribe and share with your friends.

Monday, 14 December 2020

Blogmas Day 13 DIY Christmas Gifts Handmade Tea

 Welcome to Blogmas Day 13!  Are you a coffee or tea drinker?  Myself, I love a cuppa first thing in the morning.  I have a family member who is obsessed with herbal tea.  If you read Blogmas Day 12, you know that I wrote about growing a herb garden.  If you have been harvesting and drying your herbs all summer then transforming the fruits of your labour into a sweet DIY handmade Christmas gift is simple.  If you don't have any homegrown herbs at hand, then loose herbal teas are readily available at your local health food store.  


The wonderful thing is that you don't need any type of culinary skills at all.  Mix in whatever tickles your palate such as chamomile, rosehips, hibiscus flowers or green tea.  Spoon in a generous teaspoonful or two into little drawstring bags available at craft stores and in health food stores.  


Place the filled tea bags in a pretty container.


Attach a festive tag describing the unique ingredients handpicked by you.


Related Posts Plugin for WordPress, Blogger...