About L'Heure Bleue At Home

Shop Photo Gallery

Offers and Discount Codes

Showing posts with label Renovation. Show all posts

Thursday, 30 July 2020

Budget Friendly Dry Wall Repair How To

Hello Friends!  Now that I have done as much as I can do on my own with the kitchen makeover, I have decided to move on to the closet in the office.  I say "office" but it is really a bedroom that I have been using as an office.  I suppose that many of us have had to commandeer a space in our homes as an office space.  Unfortunately, the shelf in the closet wasn't really meant to hold heavy office supplies such as reams of copy paper and client files.  Over time, the brackets holding up the shelf had begun to tear away from the drywall.


The shelf itself, which was nothing more than a pressed melamine board, had also begun to bow in the middle.  I don't know why I left it so long.  I think I was a little intimidated at the thought of removing it.  It is the second time I have had it repaired and the contractor who installed the current shelf had assured me that it was never going to rip out of the wall.  Famous last words, right?
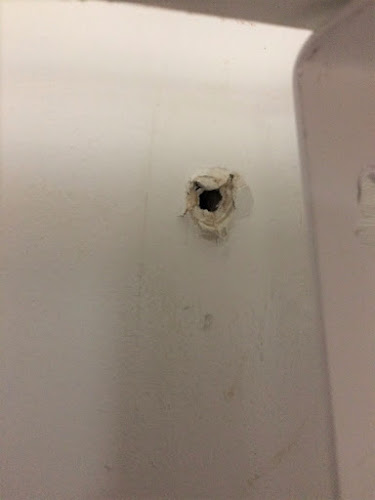
Funnily enough, taking everything down was a breeze!  The screws and anchors had torn so far out of the wall that it wasn't difficult at all to dismantle.  Unfortunately, when I took everything down, gaping holes were revealed.  The holes went right to the other side of the drywall.


Can you believe that I remembered that I had the very things in my toolkit to effect the necessary repairs?  Really, it was a bit like finding a spare can of paint in the exact right shade to paint out the blue stripe in my kitchen makeover which you can read about here.


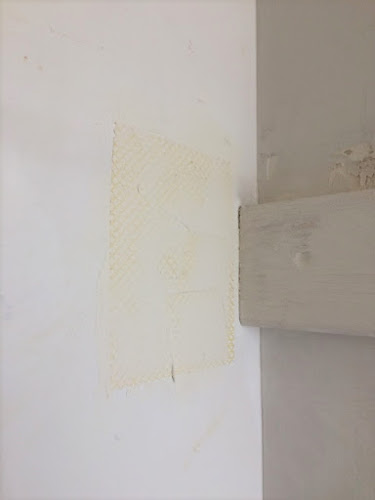
Yes, there is such a thing as a wall bandage!  Basically, it is a self adhesive fiberglass mesh that you place over the hole which provides extra support.  First I filled the hole with as much drywall compound as I could.  Then I cut a generous sized square of the wall bandage and placed it over the hole.  


I used a putty knife to trowel on the drywall compound.  


If you can't find wall bandages then self-adhesive drywall joint tape is basically the same thing that comes in a roll instead of sheets. 


 I did find that the tape was much less sticky than the bandages so it didn't adhere to the wall as well.


Once the mesh has been completely covered by the drywall compound, sand it smooth.  Repairing dry wall is a much more cost effective option than tearing it down and installing a new sheet of drywall. Also, it is something that you can do yourself that doesn't really require any specialized skill set.   Now I can move on to the next phase which is planning drawers and shelves for the closet.  It is a bit of a conundrum because I want drawers and shelves to hold office supplies but which can be repurposed down the road to hold clothes.  Also there has to be some hanging space so that the closet can be used for hanging clothes later on if need be.  I don't want to do what I did last time which was to put up another shelf and pole.  I would love a closet that looked like it had custom built-ins in it similar to California Closets but that is not in the budget.  Speaking of budget, the cost of the repairs was a big fat donut as I had everything I needed on hand.  I can't wait to move on to the next phase. Stay tuned for that!

Monday, 20 July 2020

Budget Friendly Kitchen Makeover How To During Lockdown

Hello Friends!  I hope that, wherever you are, you are slowly emerging from lockdown.  The city that I live in is still in Stage 2.  Now that we are have been spending so much time at home, the comforts of home have never been more important.  Finally, I have the time to attend to those repairs that have been  pushed to the back burner for years.  Although I would love to gut everything and start fresh, my minuscule budget didn't allow for it.  Not only that, I had no idea how to manage social distancing with any contractors that I hired as I live in a condo and not a spacious home.  The kitchen cabinet doors were in dire need of repair but I had 15 (!!) cabinet doors and 4 drawer fronts to contend with, all of various sizes.  I checked budget friendly sites like Ikea to see if I could purchase new doors but I was unable to find anything that was even close to the sizes that I needed.  After much research, I turned to Amazon, who is fast becoming my new bestie, and ordered several rolls of matte white veneer.


I chose matte white because the kitchen doesn't have any source of natural light and I felt that white cabinet doors would help to bounce light around.  There are a variety of textures and colours available, such as a faux wood but the veneer is essentially a plastic contact paper so I figured that faux wood would look...well...glaringly faux.
The cabinet doors have to be clean of any grease or dirt.  Trust me when I say that even the tiniest speck of dirt will cause an air bubble to form around it. I was pleasantly surprised  to see that the rolls were made in Germany so I was assured of quality.  There are grid lines printed on the backing paper to help you cut straight lines.  Keep the backing paper on until you begin to apply it.  If you completely remove the backing paper before application, there is a greater likelihood of air bubbles forming.


I used a rolling ruler to help smooth down the veneer as I was applying it.  I pressed down firmly on the ruler while holding the veneer up and away from the ruler.  I found that the backing paper peeled away on its own simply from the forward motion of the ruler.  I used a utility knife to trim off the excess around the edges.  
You can reposition it a few times if you find that you have made a mistake but the more you manipulate it, the greater the chance of air bubbles forming.  I had a can of spray glue at the ready but I found that I didn't need it.  Any air bubbles can be gently massaged away.  Remember to pull it tightly around the edges as air bubbles tend to form along the edge.


Refinishing the cabinet doors actually went quickly once I became familiar with how to apply it.  The fact that the doors are flat without any moulding or protruding trim really helped.
The next thing I tackled in the kitchen was the blue bulkhead.  The blue stripe running along the top of the upper row of cabinets had always vaguely bothered me.  It had been painted blue a long time ago on the advice of a real estate agent but I just found that it had no relation to the other elements in the kitchen at all. During my lockdown decluttering efforts, I found a barely touched pint can of paint in a closet along with brand new rollers and brushes.  Finding that can of paint, in the same shade as the rest of the kitchen, was like finding gold.  No need to mask up and go to the hardware store with the sign on the door that said "5 minutes max."  I don't know about you but I am fairly certain that no one in the history of humankind has ever been able to choose a shade of paint and get it mixed up in under 5 minutes.  I had everything I needed to paint over that blue stripe without spending a dime!
Before:

After:


I am so pleased with how it turned out.  The kitchen looks modern and refreshed and has a more cohesive look. The rolls were around $19 each and I needed 6 rolls.  Expensive for what is essentially contact paper but much cheaper than getting new custom doors.  I think that this is a good option if you are a tenant or if you are looking to refinish cabinetry on an extremely tight budget and have no prior experience or special DIY skills.  You don't need any special tools except a pair of scissors, a utility knife and a ruler or something similar.  Best of all, it was a project that kept me occupied and sane during these troubled times.


Thursday, 19 July 2018

How To Pick The Right Ceiling Light Fixture For Your Space

The very first time I decided to change the ceiling light fixtures in my home,  all I cared about was how they looked.  Fast forward several years, tack on a number of lifestyle changes and my criteria has lengthened considerably.  I have written before on my odyssey to change out the light fixtures in my home here,  and it was time to change out another.  The impetus came when a certain someone broke one of the glass shades on the ceiling light fixture in the kitchen.


You will see that the top right light is missing its shade.  This fixture has been a particular bugbear of mine for years.  It was chosen by a real estate agent, not me.  The glass shades have a tendency to pop off whenever the lightbulbs need to be replaced.  The lightbulbs themselves are not readily available and are expensive to replace.  Actually trying to insert the lightbulbs is a nightmare.  Add in the fact that now we have two disabled people and there are sad faces all around.  I drew up a list of criteria in my search for another ceiling light fixture that might be of help to you.

Consider What Room The Ceiling Light Fixture Is Going In

My new light fixture is going in to the kitchen.  It is a small kitchen with standard height ceilings.  I have decided that I prefer a light that gives off 360 degree lighting.  Spot lights create areas of darkness which we find annoying.  A kitchen needs to be well lit as it is a workspace.  There is no room for a breakfast nook so there is no requirement for ambient lighting.  The lights in the fumehood create a sufficient amount of task lighting.

Consider Ceiling Height

I am obsessed with Sputnik light fixtures and would put one in every single room if I could.  Those of you who are long time readers of mine know of my love for the Sputnik light fixture.  However, with standard height ceilings, this is impossible.

via Amazon.ca

Ask yourself if it is going over a dining table or a stairwell?  What is the maximum drop?  How tall are the people in your home?  Are you putting it in your foyer and will people be bumping their foreheads into it as soon as they walk through the front door?

Consider The Style And Decor Of The Room

My kitchen has a lot of matte stainless steel and the rest of the home has ceiling light fixtures in brushed nickel.  So even though my tastes have changed and I was leaning towards matte black and oil rubbed bronze,  I opted for something in brushed nickel.  In a small home, I think it is important that there be a sense of continuity and flow as one moves from space to space.  There is a round drum light in the foyer and I wanted an echo of that shape in the kitchen.  Also, I have a lot of vintage items on display but still wanted a modern feel.

via Amazon.ca

I love the edgy industrial feel of this light fixture.  I think it provides a nice fusion between a vintage vibe and a modern aesthetic.  

Consider Light Bulbs And Accessibility

I really wanted a light fixture that took Type A bulbs plus it would be easy to access whenever the bulbs needed to be changed.  I read the reviews on the one that I finally picked and one reviewer said he picked it for his mother who was elderly and had difficulty reaching up to change the bulbs.  Sold!  The fixture above is pictured with Edison light bulbs to enhance the industrial feel but it will take any Type A bulb. Compare the one above to the one below.

via Amazon.ca


I have a ceiling light fixture in the living room that is very similar to the one above.  I have to snake my arm up, over and down to change the light bulb, all the while teetering on a chair.  The bowl-like shade can't be removed so it has become a graveyard for dead insects.  Viewed from below, all I can see is a growing mound of ghostly little shadows.  Believe me when I say that the living room ceiling light is the next one to be replaced.

Consider Your Budget  

I had a couple of gift cards burning a hole in my pocket so I knew what my budget was.  It is very easy to get carried away and blow your renovation budget just on fancy lighting.  I took my time and bookmarked the one I wanted.  It was slightly over my budget but when it went on sale during an Amazon Prime Day, I whisked it into my cart and through checkout.

I hope this checklist was of some help to you.  Please add any useful tips you might have in the comments below.

This is not a sponsored post.

Saturday, 5 November 2016

LBH Eyes On Design: Butler Pantries

A friend of mine is building his dream house.  It will, of course, have a showstopping kitchen.  I underscore "showstopping" as the kitchen will be "for show."  There will be a secret, second kitchen tucked behind the "show kitchen" where the real cooking and all the messiness that that entails will take place.  I am doubtful that this concept of an enfilade of kitchens will ever become a trend (or will it?) but I have noticed the advent of "butler's pantries" infiltrating the home design world.  It seems it is not enough now to have a walk-in pantry for storing all of one's sundry foodstuffs.  The walk-in pantry, once a must have for a family home, has been superseded by a pantry that has a sink, a second dishwasher, possibly an oven and other appliances where one's butler, should one be so lucky to have one, can do all manner of kitchen related menial tasks in privacy.  In this recently renovated condominium, you can see the butler's pantry tucked away to the right of the kitchen.

Image Source: Channel Nine
Pantries aren't just for extra storage anymore!

Image Source:  Channel Nine

This one has an espresso machine and another sink.


I am not sure what to make of this trend.  On the one hand, I am swooning at the thought of all of that extra storage and the ability to tuck away any bulky, unsightly appliances that might not get a lot of daily use.  On the other hand, in this era of open plan living where cooking has entered the arena  of entertainment and has become a commonplace component of socializing, hiding away somewhere to do the prep work seems contradictory.   What do you think?  Yea or nay?


Monday, 10 October 2016

LBH Eyes On Design: Stadshem and Scandi Styling

Confession time...I am addicted to those reno shows where a hapless family cannot, for the life of them, sell their home because it is 1) cluttered 2) poorly designed 3) poorly renovated 4) badly styled or all four.  I think these shows' popularity tap into the fact that, with a bit of elbow grease and common sense, it is possible for anyone to make their house desirable and sellable.  Enter Stadshem.  It is not a reality show but a Swedish real estate company.  Just looking at the photographs of the homes on their books is a master class in how to style a home not just to sell but for every day.

via stadshem.se

Look at that living room!  It is pure Scandi style which is so very popular right now.

via stadshem.se

I am in love with the kitchen.  If I was a prospective buyer, this kitchen would have me at hello.


What I love about the styling is that it is consistent throughout the entire property.  It paints a very clear, beautiful picture of aspirational living.

via stadshem.se
The little touches almost make me believe that these are the real owners' belongings and that this is a very livable space.  Well done Stadshem!  Now I am going to go and wipe the drool off my chin.


This is not a sponsored post.


Monday, 27 May 2013

Painting with Dark Colours

With the onset of warmer weather, instead of wanting to be outdoors (which I do), the need to freshen up my home descends upon me with great urgency.  Are you in the midst of Spring Cleaning as well?  Maybe it has something to do with the increased amount of sunshine highlighting the grubby marks on the walls.  In preparation for repainting the walls, I took down the paintings and was shocked at the accumulation of dust on the frames.


And to emphasize the dirt, here's another photo.  Skip over it if you are squeamish!


Appalling, huh?  Following recommendations, I washed the walls with TSP and discovered a great time saver.  TSP took off a lot of the scuff marks to the point where some walls didn't need repainting.

 
I did repaint one main wall as there was quite a bit of damage to the dry wall underneath which required replastering.  It was originally painted with Benjamin Moore's Rocky Road, CC 470, but I decided to redo it with Benjamin Moore's Hiking Trail, CC 514 which is a couple degrees darker.  The paintings that I have up on that wall have light coloured backgrounds and I thought they would "pop" more against a darker wall.  I forgot to take a before shot but here is an after shot.

Here are close ups of the paintings.


I repainted the kitchen as well with Hiking Trail.  Originally, it was a pale blue but I discovered that it just did not work with the granite countertops which are a very dark green.  Another consideration was that there is no natural light in the kitchen.  White and other light colours just appear flat and dead in a dark room which sounds illogical, I know, but it's true.  Also I have a display of blue Pyrex in the kitchen and they weren't standing out against the blue walls.  Here is a before shot.  Please forgive the poor quality of the photo.  I was balanced on a chair with a camera in one hand and a paint roller in the other. 


The only "problem" with the new colour is that it is a warm brown, the shade of milk chocolate.  In fact, every time I look at the walls, I get hungry as I think of a milk chocolate bar!


The aqua blue of the Pyrex casserole dishes "pops" so much more against the darker colour and looks a great deal more vibrant, don't you think?  Is it completely mad to base a decorating decision partly on wanting to showcase a vintage collection?  Have you ever done that?  I have lots more Spring Cleaning to do but I am determined to soldier on despite the lure of sunny skies.   Please let me know how you are getting on so that I can stay motivated!


Thursday, 25 April 2013

Easy Lampshade Conversion

I do love learning something new, don't you?  As part of my bedside table redo which I wrote about here, I had a pair of lamps that were beginning to look a bit the worse for wear.  I had picked them up at Pottery Barn years ago. They were good quality, they still worked and the bases were a neutral silver tone nickel so I decided to keep them.  However, the parchment shades that they came with had yellowed slightly over time and I was tired of the cone shape.  I searched high and low for replacement shades but the wire frame of the old ones were unusual and I could not find any shade with a similar frame.  Have you ever seen a frame like this?


I discovered that, nowadays, most lampshades have a "spider" frame which requires a base with a harp and a finial to secure the shade in place.  Obviously, my lamps didn't have a harp and finial.  I tried recovering them but that was a disaster.  I won't show you what happened because you'd probably fall off your chair laughing.  I jumped online (as one does) to see if I could find lampshades with the weird configuration that mine had.  No luck.  As I was moodily searching around online, staring at countless lovely lamp shades that would never fit onto my lamps and contemplating having to throw away perfectly good lamps, quite by accident, I saw something that made me sit up.  This something was called a clip-on lamp shade adapter!


What!  Why had I never heard of such a thing?  It would have saved me hours of fruitless searching.  This deceptively simple piece of hardware allows you to convert a lamp without a harp to one that fits a lamp shade with the ubiquitous spider frame.  Plus if you are like me and have a fondness for vintage lamps, you know that a lot of vintage lamps don't have a harp and require a clip on lampshade.  The lamp shade adapter allows you to convert such lamps as well.  No more being stuck with a fantastic vintage lamp that's crowned with a tattered ugly shade.  I ended up rushing out to Rona to get mine but I'm sure you can get them at any hardware store.  They are so easy to install.  Just clip them on to a lightbulb (not CFL bulbs with the twisted shape) and that's it!  Next step was to find new lampshades.  I wanted something rectangular or square as they were going on bedside tables.  Rectangular shades have a smaller footprint as they can be butted up against a wall.  I wanted a bit of colour as the wall behind the bed is light and I wanted them to stand out a bit. I ended up finding the perfect ones at Walmart of all places.


This is "his" side of the bed.  It's hard to see but the shades are a natural, sand toned linen with a rough texture.  I was looking at shades with colour and pattern for a long time but ended up with fairly neutral ones. 


You'll notice the adapter is a brass tone and the base is nickel silver.  I did think of spray painting the adapter silver but wasn't sure if that was a good idea as the clip-on part is in direct contact against a very hot bulb.  I would like to find a nicer finial at least but as it is somewhat hidden, it isn't a priority for now.  I am thinking of painting the wall behind the bed an accent colour so a neutral shade would "pop" against an accent wall.  I know that accent walls generate divided opinion and much heated discussion in the decor world.  What do you think of accent walls?


I am so pleased that I was able to rejuvenate the lamps.  I adore the rectangular shape as I think it has a more modern look.  Plus if I am ever brave enough to attempt recovering a lampshade again, I think the straight lines of a rectangle will be a lot easier to handle.  I love a quick and easy DIY, don't you?


Tuesday, 17 May 2011

The Heart of the Home

Do you remember looking forward to "show and tell" at school?  Would you like to know what I have been doing lately?  I hope so as I would dearly love to do a bit of show and tell!  I have been renovating my kitchen which was in dire need of a surgical intervention.  It has been a long and arduous process circumscribed by a budget the size of this ===> .
I had replaced the stove, refrigerator and fume hood already in this photograph:
Due to budgetary reasons, the cabinetry and tile flooring had to stay for the time being.  Because of these elements that were staying, any new additions had to work with the existing colour scheme.  The people who lived here before me used the laminate countertop as a chopping board and it was in a sad state.  The porcelain sink was stained and scratched and the faucet was a drippy mess.  A granite countertop, stainless steel double sink, new faucet and dishwasher was installed.

I bought the countertop, sink and faucet from Home Depot.  At Home Depot, granite comes in different price brackets.  In my price range, I only had two choices.  One was a peachy pink which was clearly not an option.  The other option was the one I chose.  It looks black from far away but is actually made up of very dark green, iridescent clear, white, black and amber chunks.  When I look at it, I am reminded of a river rushing over pebbles.  It gives the space a warmth and depth that balances the severity of the stainless steel and grey tones.  When the old countertop was taken away, it left a gap where the partial laminate backsplash used to be.  I couldn't find any combination of tile to fit that gap.  Then in a moment of inspiration, I came up with the idea of having a custom made stainless steel backsplash to fit that gap.  Initially, the contractor I had asked to help me fabricate it brushed away my idea and I noticed he did so time and again with many of my ideas. Nonetheless, I prevailed and am so pleased with the result as it echoes the stainless steel appliances, the grey strip of tiles further up the back wall and was a cost effective solution that saved me the bother of retiling the entire backsplash.  I wanted to weld the old and the new together and still achieve a cohesive look.
 
When I started renovating my home, I was full of uncertainty but determined to try.  I had never owned, much less operated a power tool before and often had to rely on Google to show me what to do.   And I discovered that this journey has become a journey of self-discovery.  The process has pushed my creativity, imagination and resourcefulness to the limits.  At times, it has been difficult to stay true to my artistic vision in the face of doubting naysayers but that can be said about many aspects of life, wouldn’t you agree?
And they do say that the kitchen is the heart of the home.  Now I can say that the heart of L'Heure Bleue At Home has been refurbished, mended and sewn back together with care.  And, if I could, I would like nothing more than to invite you over for tea.

I am linking up to A Beach Cottage and Good Life Wednesdays.

Related Posts Plugin for WordPress, Blogger...